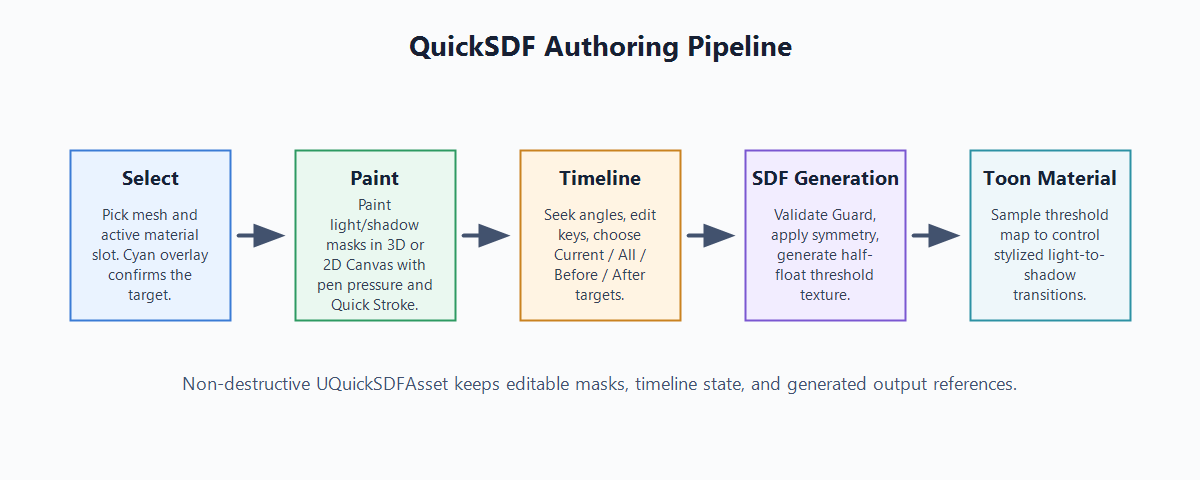
Authoring Workflow
QuickSDFTool is designed around one material slot at a time: select the mesh and slot, paint light/shadow masks across angles, then generate a threshold texture for the toon shader.
Workflow Screenshots
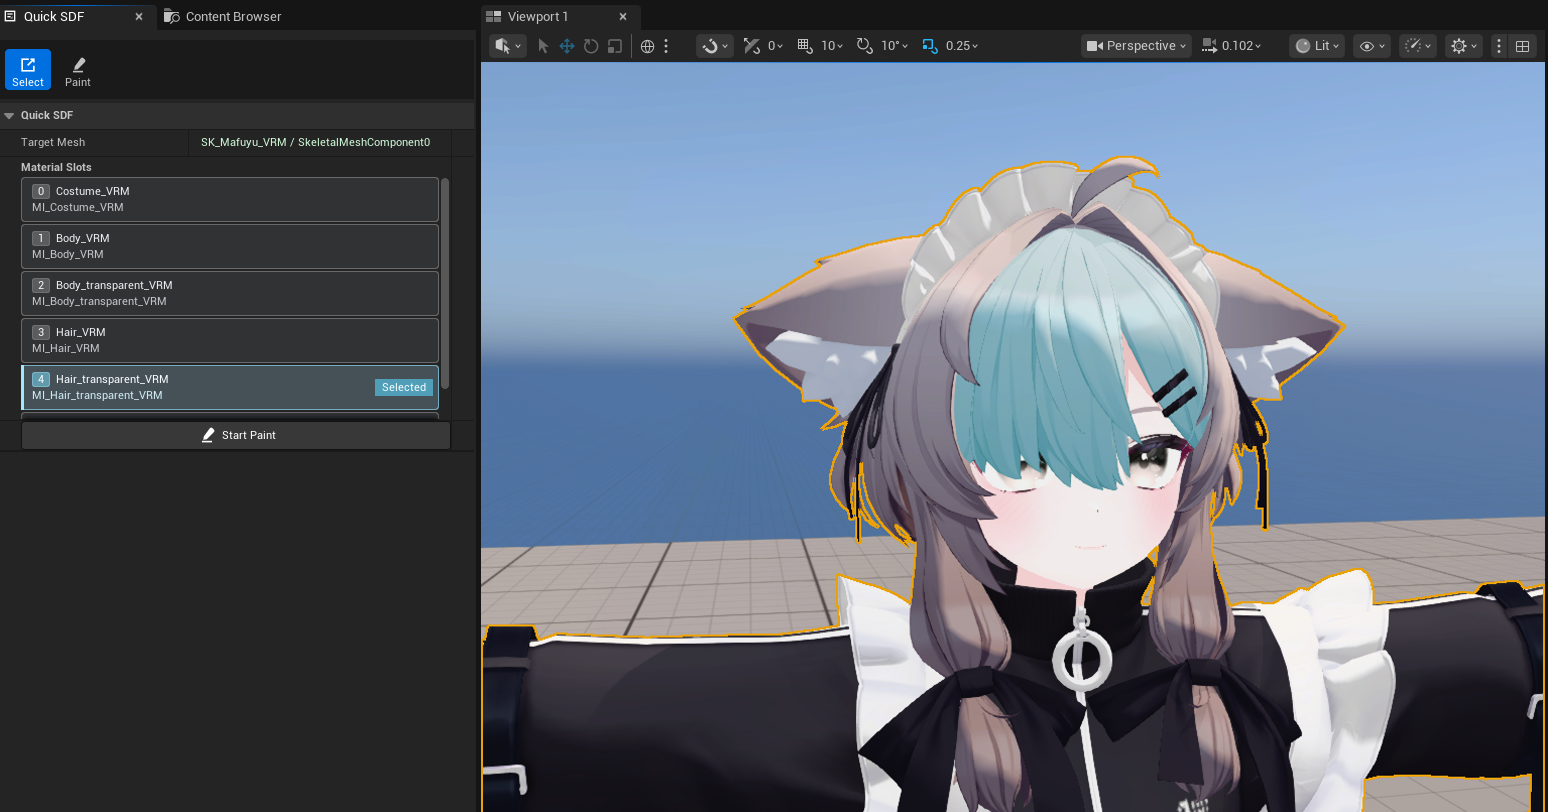


Screenshot character model credit: 真冬 Mafuyu / Original 3D Model by ぷらすわん. Character design and 3D modeling: 有坂みと.
Controls
| Input | Action |
|---|---|
LMB Drag |
Paint light/white |
Shift + LMB Drag |
Paint shadow/black |
| Hold a stroke still | Enter Quick Stroke after Quick Stroke Hold Time |
Viewport Mesh / Material Click in Select mode |
Select the target mesh component and clicked material slot |
Start Paint |
Enter Paint mode using the selected target mesh and material slot |
F in Paint mode |
Focus the viewport on the current brush position; falls back to UE selection focus when no brush hit is active |
Ctrl + F, move mouse or pen, click |
Resize the brush while the pointer is over the viewport or 2D Canvas |
Alt + T |
Open the quick toggle menu |
Alt + 1 |
Cycle paint target mode |
Alt + 2 - Alt + 8 |
Toggle Auto Light, Preview, UV overlay, Onion Skin, Quick Stroke, Symmetry, and Monotonic Guard |
Left / Right Arrow |
Select previous / next timeline frame |
Material Slot Row Click |
Select or correct the material slot / texture set to edit |
Material Slot Bake Icon |
Bake that slot only |
Timeline Seek Lane Click / Drag |
Seek the preview light angle without dragging keyframes |
Timeline Key Click |
Select angle |
Timeline Key Drag |
Adjust angle after the drag threshold is crossed; the seek cursor and preview light follow the drag |
Timeline Status Badge Hover |
Inspect angle, texture, edit state, paint target inclusion, Guard state, overwrite state, and warning details |
Timeline Add / Duplicate / Delete |
Create, copy, or remove keyframes |
Timeline 8 or 15 / Even |
Complete the default mask set or redistribute angles evenly |
Drag Texture2D assets onto timeline |
Import edited masks |
Ctrl + Z / Ctrl + Y |
Undo / Redo |
Select And Material Slots
The Quick SDF > Material Slots section is optimized for artists editing one material slot at a time.
- Select mode starts non-destructively, keeps the whole mesh visible, and clears stale targets when nothing is selected.
- Clicking a mesh surface in the viewport selects both the target mesh component and the hit material slot.
- Row clicks select or correct the corresponding texture set and active paint/bake target.
- Select mode uses a cyan viewport overlay to show the active slot instead of hiding the rest of the mesh.
- Paint mode starts with Isolate Slot enabled by default. Turning it off restores full-mesh visibility while the selected slot remains the paint target.
- Paint picking and stroke sampling use the selected slot as an edit filter, so non-target slots do not steal hits from the active slot.
- Each row shows slot number, slot name, material name, and compact status such as
Selected,Baked, orEmpty. - The row action button bakes only that slot, using the active slot as the material bake scope for original-shading masks.
- Visible rows are rebuilt from the current mesh component, so switching targets does not leave stale
Missingrows in the active UI.
Painting
- Mesh painting supports Static Mesh and Skeletal Mesh components, including Skeletal Mesh assets without a PhysicsAsset.
- Screen projection is the default paint mode. It is useful for direct face and hair shadow authoring from the current camera.
- Surface and UV-oriented painting remain available for mesh-space and texture-space workflows.
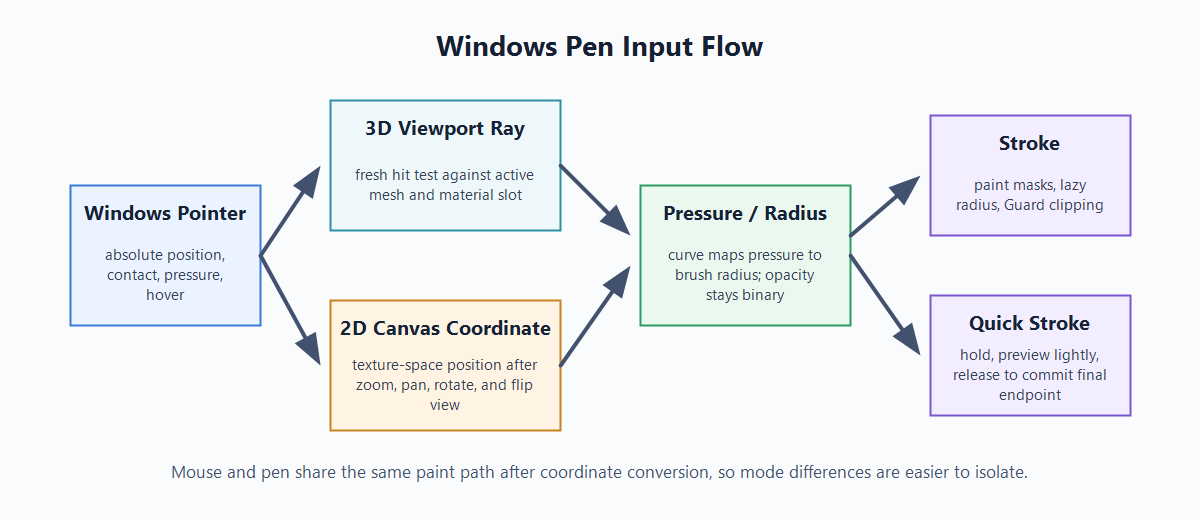
- Brush input includes lazy-radius stroke stabilization, fine spacing, antialiased brush masks, and pressure-driven brush radius for tablet workflows.
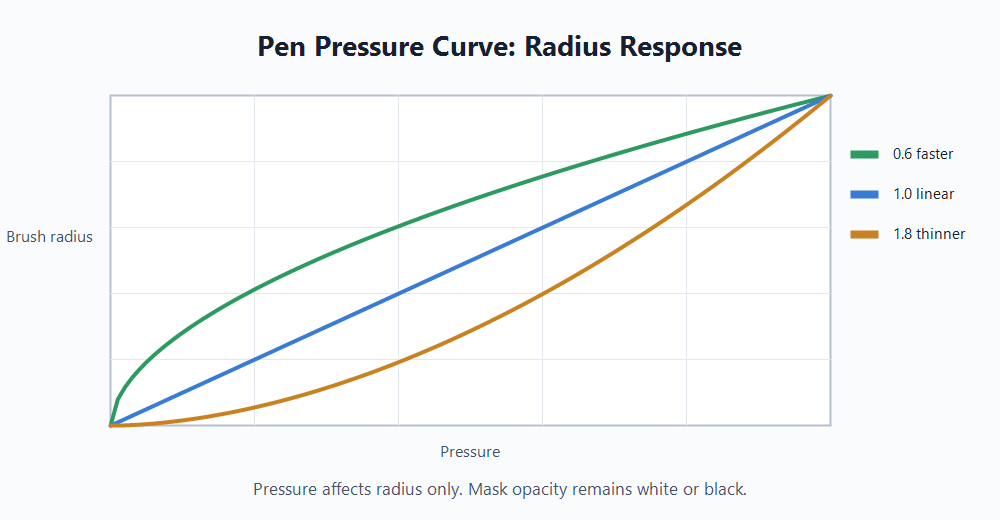
- Pen pressure is enabled by default and affects brush radius only, not mask opacity. Use Advanced > Pen Pressure to disable it and Advanced > Pen Pressure Curve to tune the response.
1.0is linear, higher values keep light pressure thinner for longer, and lower values reach larger radii sooner. Ffocuses the active viewport on the current brush hit. If the brush is not over a valid hit, the key falls back to UE’s standard selection focus.
2D Canvas
Use the 2D Canvas when the stroke must be placed directly in texture space or when UV guides are more important than the 3D surface view.
- Open the canvas from Paint mode after selecting a valid mesh, material slot, texture set, and timeline angle.
- The canvas follows the active Texture Set and Angle. If the active slot or timeline key changes, confirm the selector before painting.
- Brush size is shared with the paint tool.
Ctrl + Fbrush resize works over the 2D Canvas as well as the 3D viewport. - Fit shows the full texture in the canvas; 100% shows one texture pixel per screen pixel where possible.
- Rotate and flip controls change the canvas view orientation only. They do not rotate or flip saved mask data.
- Checker and grid overlays help judge transparent/background areas and texel spacing.
- UV overlay shows the active UV channel; onion skin helps compare neighboring masks while editing a single angle.
- Windows pen input is converted from the current absolute pointer position into canvas coordinates for hover, stroke start, drag, release, pressure, and brush resize. The visible brush circle and painted stroke should remain aligned after moving or resizing the canvas window.
Quick Stroke
Quick Stroke is a hold-to-place stroke workflow for straight or carefully positioned strokes.
- Keep Quick Stroke enabled from the quick toggle menu or Advanced settings.
- Press and hold without moving farther than Quick Stroke Move Tolerance.
- After Quick Stroke Hold Time, the current stroke becomes a Quick Stroke preview.
- Move the mouse or pen to adjust the preview endpoint. The preview update is intentionally lightweight so high-frequency pen movement does not force full stroke work every frame.
- Release to commit the final stroke at the latest pointer position. The committed stroke uses the final endpoint, not an earlier preview sample.
- Quick Stroke works in 3D Paint and the 2D Canvas. It also respects
Current / All / Before / After, active material slot filtering, symmetry, and Monotonic Guard clipping.
Timeline And Paint Targets
The timeline separates seeking from keyframe editing to reduce accidental changes.
- The upper seek lane is the only area that seeks the preview angle by click or drag.
- The lower keyframe lane contains thumbnails and key handles. Keyframes select on click and move only after the drag threshold is crossed.
- Dragging a keyframe updates the seek cursor and preview light immediately.
- Paint-target range highlights are shown for
Current,All,Before, andAfter. The visible range uses neighboring-angle midpoints so it matches the masks that will be edited. - Key status badges are hit-test invisible and do not interfere with selecting, dragging, importing, or seeking.
- The
8/15andEvencontrols complete the default mask set or redistribute angles. Symmetry mode completes to 8 masks; non-symmetry mode completes to 15 masks.
Live SDF Preview
Live SDF is a material preview mode for fast shape feedback while painting. It is intentionally separate from the saved Generated SDF texture.
- Enable it from Material Preview only when you need live feedback. No GPU preview work is generated while another material preview mode is selected.
- The preview uses the GPU Jump Flooding Algorithm path to approximate the threshold map from the editable paint render targets.
- Live preview resolution is selected in Advanced > Live SDF Preview Resolution with
128 px,256 px,512 px, and1024 pxpresets. The selected value becomes the long edge of the transient preview render target. - Higher values improve edge stability and small detail readability, but increase GPU cost.
512 pxis the default balance. - JFA passes are completed inside a single preview update. They are throttled during strokes, but the individual JFA steps are not spread across multiple frames.
- The final saved SDF still uses the CPU generation path, including full-resolution processing, upscaling, UV island mirror output, and final export packing.
Symmetry Modes
QuickSDFTool supports four SDF generation modes:
Auto: default face-painting mode. The tool analyzes the active mesh, UV channel, and material slot, then chooses Texture Flip or UV Island Channel Flip.Off: paint the full 0-180 degree sweep normally.Texture Flip: paint 0-90 degrees and mirror the texture for the 90-180 side.UV Island Channel Flip: paint 0-90 degrees and generate the 90-180 side per UV island through island-local mirrored sampling.
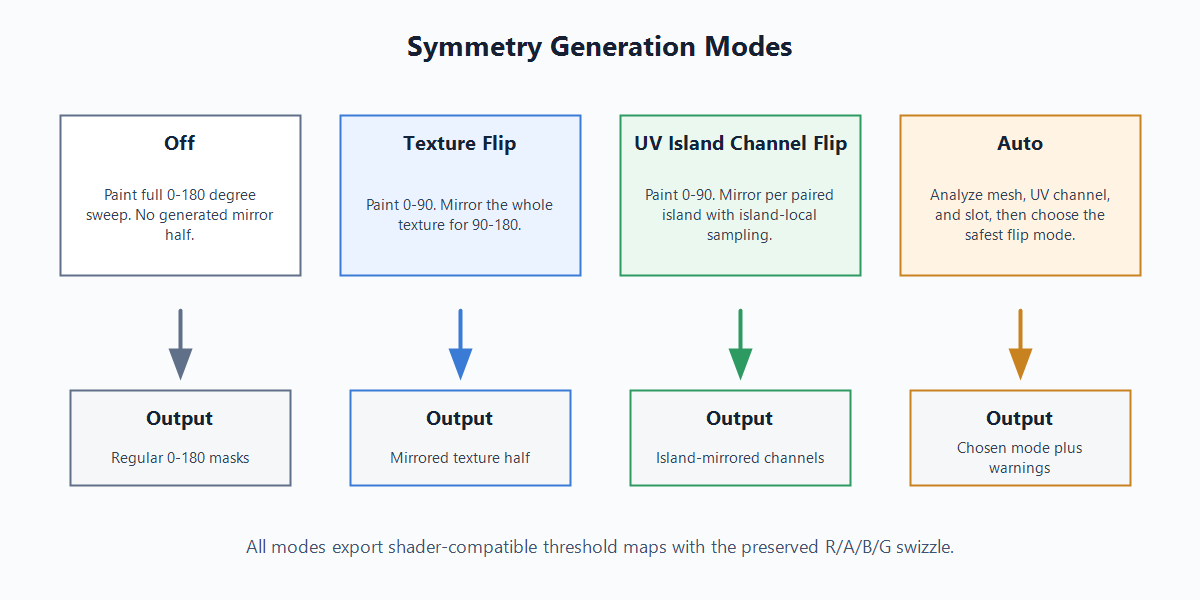
UV Island Channel Flip is intended for assets where left and right UV islands are separate but still mirror each other. It tolerates position, scale, and light shape differences through normalized island-local mapping, but it does not perform nonlinear per-island warping. Ambiguous, unpaired, overlapping, or out-of-range islands fall back to copying the source-side values and produce warnings.
The generated texture remains shader-compatible with the regular 0-180 layout. Internally, the legacy combined field is processed as R/G/B/A, then final export uses the R/A/B/G swizzle (R <- R, G <- A, B <- B, A <- G) so existing shader expectations and the historical B channel behavior are preserved.
Monotonic Guard
Monotonic Guard is an optional paint-time safety check for SDF threshold masks. It treats R >= 127 as white and lower values as black, then prevents repeated transitions such as black -> white -> black or white -> black -> white across the processable angle sequence.
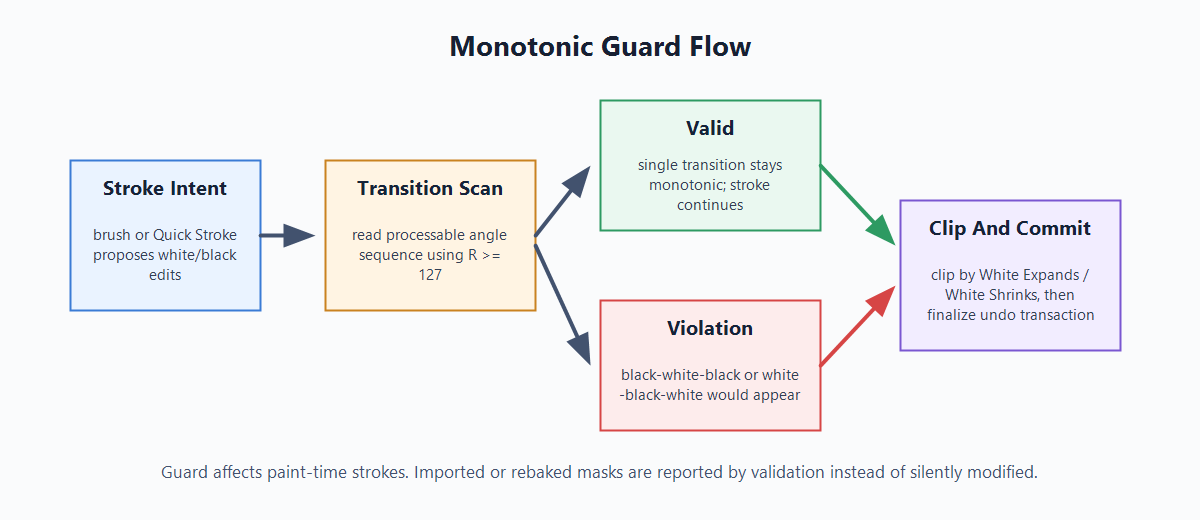
- The quick toggle is labeled
Guard; the shortcut isAlt + 8. Clip Directiondefaults toAuto:0-90degrees usesWhite Expands, and90-180degrees usesWhite Shrinks.- Normal brush strokes and Quick Stroke are clipped silently before the undo transaction is finalized.
- Soft antialiased stroke edges are handled as stroke intent, even if they do not cross the
127binary threshold. Current / All / Before / Afterstill decide which masks receive the stroke.- Imported masks, rebaked masks, and SDF generation are not automatically modified. Use validation or run SDF generation with Guard enabled to get warnings about existing violations.
Mask I/O And SDF Generation
- Mask import supports file picker import and timeline drag-and-drop.
- Mask export allows external editing and review.
- Work is stored non-destructively in
UQuickSDFAsset; mask textures can be saved with the asset when needed. - SDF generation uses CPU processing with automatic Monopolar/Bipolar packing, optional 1x-8x upscaling, R/A/B/G output swizzling, and half-float texture export.
Generated SDFdisplays the saved final texture.Live SDFdisplays the transient GPU JFA approximation and is not saved as the final output.- Generated maps are saved under
/Game/QuickSDF_GENERATED/by default. - Use Material Setup for shader integration details.
Screenshot Backlog
These images must be captured from a real UE editor session, not generated diagrams:
- Select mode active material slot overlay.
- Paint mode Screen Projection with the green brush circle, UV preview, and active slot context.
- Timeline thumbnails / seek lane / keyframe lane / status badges.
- Generated SDF preview.
- 2D Canvas while drawing with a pen, with the brush circle aligned to the stroke position. Keep the existing GIF and add a static PNG.
- 3D Screen mode while a pen is hovering, showing the green brush circle.
- Quick Stroke following after hold in the 2D Canvas.
- Quick Stroke following lightly in 3D Paint.
- Advanced settings showing Pen Pressure and Pen Pressure Curve.
- Optional:
Ctrl + Fpen brush resize in progress, useful for explaining the input fix.